|
|
|
 |
 |
|
|
|
|
Pro Detailing DVD!
|
||
|
|
||

|
||

|
||

|
||

|
||

|
||

|
||

|
||

|
||

|
||

|
||
|
||

|
||

|
||
|


|
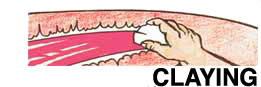
What is "Claying"?
Claying is a process that is new to the world of automotive detailing and has found enthusiastic acceptance. It's not hard to understand why, as its resume reads like a miracle cure, and after reading it you may think that it's too good to be true. But claying delivers.
The clay we are talking about is similar to the toy "Play-doh" that kids enjoy although a special type is required for car detailing. It performs it's function by removing the contaminants from the surface of the paint. It works by virtue of its flexibility as it easily forms the exact contour of the surface it is in contact with. What it does for a painted surface is similar to the function of polish, but unlike polish, clay is not an abrasive. This is an advantage for the beginning or casual detailer, as no harm can be done to the paint. Claying also does not remove wax, so unlike polish, there is no need to reapply it after an application. It works on surfaces that might not be appropriate for polish, such as glass, brightwork and trim items. Claying is also relatively quick and easy when compared to a polish job. Clearly a winning situation all around!
How to Clay
To work with clay you will need a lubricant. Fortunately what you use is not critical and many products will work fine. Many clay kits ship with a "Quick Detailer" spray which works. Our recipe consists of a tablespoon of car wash detergent in about 20 oz. of distilled water and dispensed using a spray bottle. Others have reported that Windex and other glass cleaners work well.
|
|
Some Experimenting
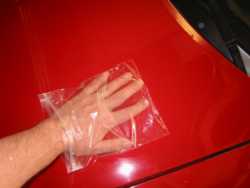 The "baggie test" is the way to go and is recommended as an easy way to demonstrate the power of claying. Put your hand in a ordinary sandwich baggie (the thin kind, not the thick rugged ones) and spray a test area of the paint with the above described clay lubricant. Then go over the paint surface as shown with just enough pressure to get a feel for the surface. You'll detect all sorts of bumps and defects, many more than are apparent with even a close visual inspection. The "baggie test" is the way to go and is recommended as an easy way to demonstrate the power of claying. Put your hand in a ordinary sandwich baggie (the thin kind, not the thick rugged ones) and spray a test area of the paint with the above described clay lubricant. Then go over the paint surface as shown with just enough pressure to get a feel for the surface. You'll detect all sorts of bumps and defects, many more than are apparent with even a close visual inspection.
Claying is an odd process. If you haven't tried it, it can be difficult to understand as it doesn't seem to conform to most of what we know about car detailing. If this is your thinking, we encourage you to give it a try. It really is easy! Many amateur detailers are a bit wary of the concept but after they try it, they are sold big time. A clay bar is good for about four to five treatments. This depends on factors such as the size of the vehicles and how dirty they are. One important note: if you ever drop a clay bar, you MUST throw it away. The potential for causing scratches from material it picks up is just too great. If you intend to reuse the clay bar, store it in a box or baggie to keep it clean. 
|
Suggestions? Comments? Tricks that you have found work well? Tell us!!! |

|

|